ByArsalan MustafaBlogsComments Off on How to Make an Embroidered Badge – Easy DIY Guide
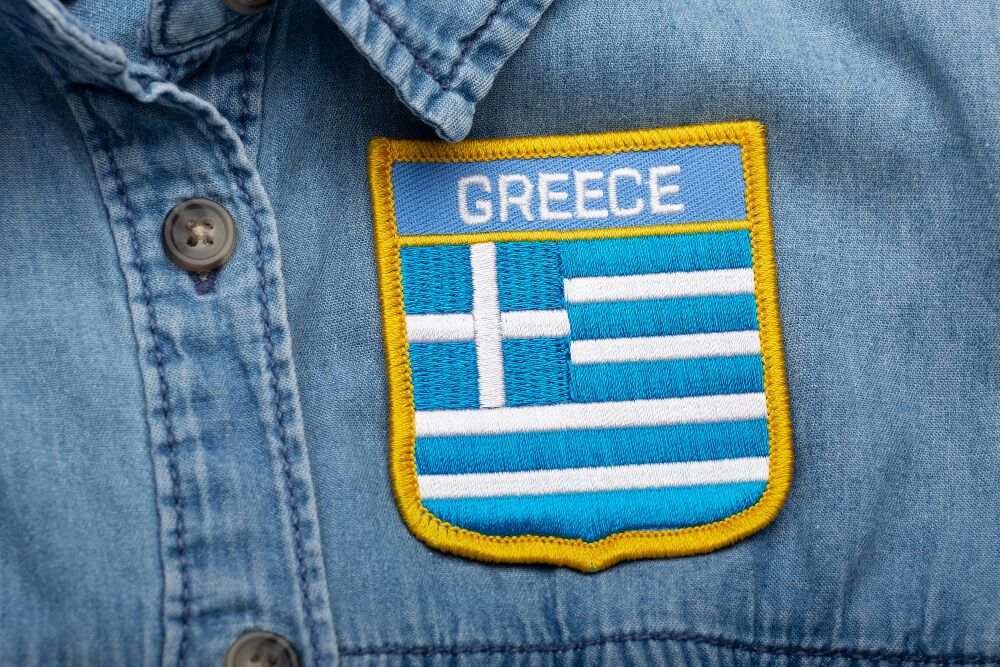
Embroidered badges add a professional and personal touch to clothing, accessories, and crafts. With the right tools and guidance, making your own badge is simple and fun. This guide from Qualitycare will walk you through the process step-by-step, helping you create beautiful and durable embroidered badges for teams, clubs, or personal projects.
You’ll Need
Gather these essentials before you start:
Embroidery thread (various colors)
Embroidery hoop
Fabric (cotton or canvas works best)
Embroidery needle
Scissors
Pencil or fabric marker
Optional: Adhesive backing or heat-seal for patches
Template for your design (hand-drawn or printed)
Instructions Step-by-Step
Make Your Own Badge
1. Choosing a Shape and Size Decide the shape of your badge—circle, oval, shield, or any custom shape. Draw or print the design, ensuring it is clear and sized appropriately for embroidery.
2. Prepare the Fabric Cut a piece of fabric slightly larger than your badge design. Stretch the fabric tightly in the embroidery hoop to prevent puckering while stitching.
3. Design Transfer Use a pencil or fabric marker to trace your design onto the fabric. Center it in the hoop for accurate and even embroidery.
4. Start Embroidering Thread the needle with 2–3 strands of embroidery thread for detail work. Use:
Backstitch for outlines
Satin stitch for solid fills
French knots for intricate details
Follow the design carefully for consistency and professional quality.
5. Finish the Badge Trim the excess fabric around your design once embroidery is complete. Seal the edges using fabric glue or a zigzag stitch to prevent fraying. Apply adhesive or heat-seal backing to the reverse side for durability.
Success Tips
Applications for Embroidered Badges
Embroidered badges are versatile and can be used for:
Uniforms for schools, sports, or work
Promotional items and branding
Personalized gifts for friends and family
Scouts, clubs, or hobby groups
FAQs About Embroidered Badges
Q: Can I use any fabric for embroidered badges? A: Cotton and canvas are ideal because they are durable and easy to embroider.
Q: How can I prevent my embroidery from puckering? A: Keep the fabric taut in the hoop and avoid pulling the thread too tightly.
Q: What is the best method to attach embroidered badges? A: Heat-seal backing provides a secure, professional finish, but adhesive can also work for casual projects.
Final Thoughts
Making embroidered badges is a rewarding DIY craft that combines creativity with skill. By following this guide from Qualitycare, you can create professional-quality badges that are perfect for uniforms, gifts, branding, or personal projects.
Embrace the process, practice your stitches, and enjoy the satisfaction of producing a badge you can proudly display or gift.
Halloween embroidery patterns let you create seasonal decorations, personalized gifts, clothing details, and small handmade keepsakes with basic needlework skills. You can choose cute ghosts, black cats, pumpkins, bats, witch hats, cobwebs, or detailed haunted houses, then adapt the colors and stitches to your project. For beginners, simple outlines and...
An embroidered beanie adds a personal touch to your winter wardrobe with custom flowers, initials, leaves, or geometric designs. You can embroider a knit beanie by hand with embroidery floss, a needle, and a suitable stabilizer, or use an embroidery machine for more detailed designs. The key is to control...
Embroidery thread colors affect design visibility, brand consistency, texture, and the appearance of finished stitches. The right shades help you reproduce logos accurately, create realistic artwork, and coordinate embroidery with fabric. An embroidery thread colors chart helps you identify shades by number, name, and color family, while conversion charts help...
Learning how to embroider on a sweatshirt requires a suitable design, the right stabilizer, and careful fabric control. Sweatshirt fleece is thicker and stretchier than woven cotton, so preparation matters. With a home embroidery machine or hand needle, you can create a custom motif, name, border, or sleeve detail. Quality...
Bulk Christmas gift orders come with tight deadlines. Speed and accuracy matter more than ever during the holiday season. Vector artwork helps businesses complete large orders faster without sacrificing quality. Clean Artwork Reduces Preparation Time Vector files arrive clean and organized. They do not require heavy cleanup or redraws. This...
Christmas gifts need to look clean, polished, and professional. Vector files play a major role in achieving that quality. Without proper vectors, even the best gift idea can lose its premium feel. Clean Designs Start with Vector Artwork Vector files use smooth paths instead of pixels. This keeps artwork sharp...
Last-minute Christmas gifts still need to look thoughtful and premium. Digitizing makes fast customization possible without sacrificing quality. When time is short, embroidery digitizing delivers reliable and professional results. Why Digitizing Is Ideal for Urgent Christmas Orders Digitized embroidery runs quickly once files are ready. There is no drying time...
Christmas gifts should feel special the moment someone sees them. Digitized embroidery adds that premium touch through clean stitching and rich detail. Unlike basic decoration, professional digitized embroidery transforms simple items into high-end holiday gifts. Premium Gifts Start with Professional Digitizing Embroidery quality depends on how well a design is...
Are you searching for professionally digitized Christmas embroidery patterns ready for immediate use? There's no need to waste time with poor-quality designs or DIY digitizing struggles! A comprehensive pattern library with professionally prepared files saves time and ensures consistent quality. This guide will show you what makes a premium pattern...