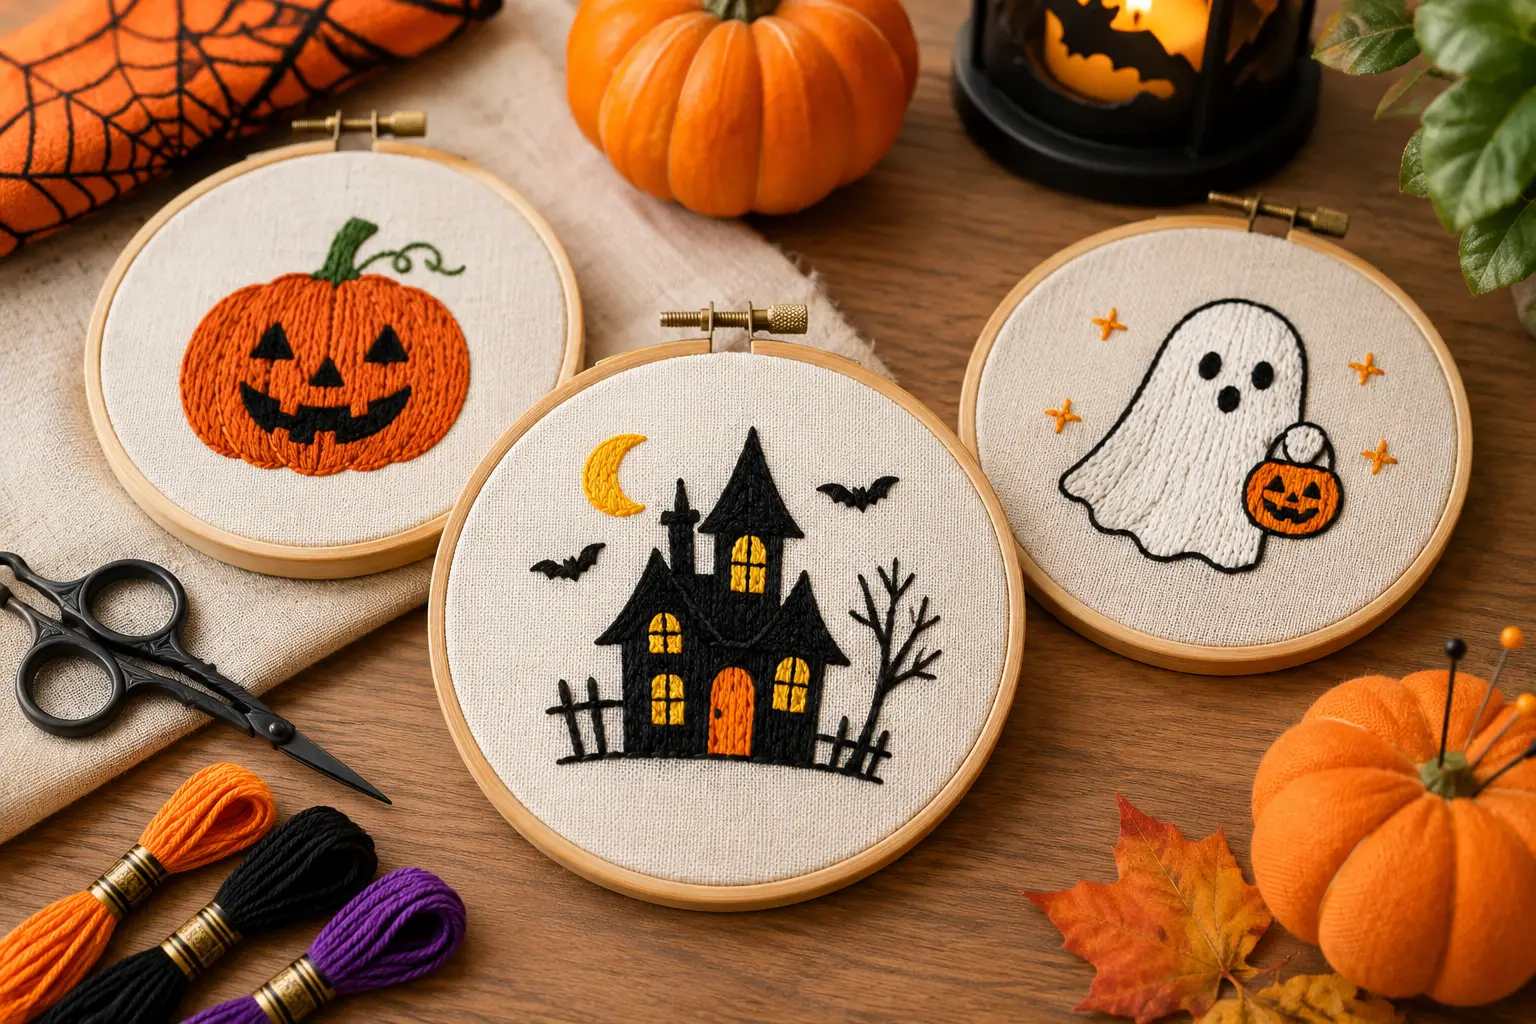
Halloween embroidery patterns let you create seasonal decorations, personalized gifts, clothing details, and small handmade keepsakes with basic needlework skills. You can choose cute ghosts, black cats, pumpkins, bats, witch hats, cobwebs, or detailed haunted houses, then adapt the colors and stitches to your project. For beginners, simple outlines and a limited color palette offer the easiest starting point. Quality Care Digitizing helps you explore embroidery design needs when you want artwork prepared for machine embroidery.
1. Cute Halloween Embroidery Designs for Beginners
Cute designs suit beginners because they rely on clear shapes, short outlines, and a few colors. Start with a smiling ghost, tiny bat, candy corn, pumpkin face, or black cat silhouette. Use backstitch for outlines, satin stitch for small filled areas, and French knots for eyes or decorative dots. These motifs work well on hoop art, tote bags, tea towels, felt banners, and small gift pouches.
A ghost pennant or a row of candy bats makes a manageable first project because each motif can be stitched separately. Choose white, orange, purple, and black floss, but adjust the palette to match your home décor. Keep facial details large enough to stitch cleanly; very small eyes and mouths can disappear into the fabric.
2. Spooky Halloween Embroidery Ideas
For a darker look, choose a spiderweb, raven, skeleton hand, haunted house, moonlit cabin, or gothic rose. A spiderweb uses straight or slightly curved lines, while a raven needs more careful direction in the stitches to define the wings and beak. A skeleton or skull design can combine bold outlines with small floral details for a modern gothic finish.
Cobwebs, bats, and a crescent moon make a strong design for a small hoop. For a more detailed project, add a crooked house, bare branches, and a few windows in warm yellow thread. Black fabric creates contrast, although dark cloth can make stitching harder to see. Place a light-colored stabilizing surface underneath when needed, and work under a bright lamp.
3. Pumpkin, Witch, and Black Cat Motifs
Pumpkins are among the most versatile Halloween motifs. Stitch a simple jack-o'-lantern with orange satin stitch, a green stem, and a black face, or use backstitch to outline a pumpkin with minimal filling. A pumpkin patch design can combine different sizes and shades of orange for more visual detail without requiring advanced stitches.
Witch-themed patterns offer several options: a witch hat, broomstick, potion cauldron, or floral hat with a skull accent. A small black cat can sit beside a pumpkin or curl under a moon. Use long-and-short stitch for fur or satin stitch for solid shapes. Keep narrow sections broad enough for the needle and thread to cover the fabric without creating bulky knots.
4. Halloween Cross-Stitch Patterns
Cross stitch differs from free-form hand embroidery because you build an image from repeated X-shaped stitches on an even-weave fabric or counted canvas. Popular Halloween cross stitch patterns include pixelated bats, candy corn characters, pumpkins, spiders, cauldrons, creepy castles, and “too cute to spook” sayings. The chart specifies stitch placement, so the method suits people who prefer a measured design.
Before you start, check the chart size, fabric count, floss colors, and finished dimensions. A small pattern with fewer colors is usually easier to complete than a dense scene with many fractional stitches. Counted cross stitch also makes it simple to resize a design by changing the fabric count, although the final dimensions and thread coverage will change.
5. Modern Embroidery Patterns and Unique Ideas
Modern embroidery combines traditional stitches with clean layouts, unusual color palettes, and contemporary themes. Try a floral skull, spooky mushrooms, skeleton couple, tarot-inspired moon, ghost garden, or gothic flower bouquet. These designs balance Halloween details with botanical or decorative elements, so you can display them beyond October if the color scheme suits your space.
For a personalized piece, add a name, short phrase, date, or small symbol to a pumpkin or ghost design. Use a consistent letter style and leave enough space between text and artwork. If you plan to stitch a design on clothing, choose a motif that fits the garment’s shape. Quality Care Digitizing can help when you need embroidery artwork prepared for machine stitching.
6. Free Halloween Embroidery Patterns and Downloads
You can find free Halloween embroidery patterns on craft blogs, designer websites, and needlework resource pages. You can also explore seasonal embroidery patterns for ideas that work across different holidays. Some collections include ghosts, spiderwebs, fall leaves, pumpkins, bats, and small seasonal sayings in one download.
Review the download details before printing. Check whether the file includes a pattern, stitch guide, color key, and transfer instructions. Some free designs are for personal use only, while others have separate terms for commercial use. Confirm the creator’s license before selling stitched items or using artwork in products. If you prefer a ready-to-use collection, a paid pattern may include clearer instructions and coordinated designs.
7. Halloween Embroidery Kits for Adults
A Halloween embroidery kit for adults can reduce setup time because the package may include a printed pattern, fabric, hoop, needle, floss, and instructions. Kits commonly feature bats, pumpkins, ghosts, witch hats, haunted houses, or floral skulls. A complete kit is useful when you do not already own embroidery supplies or want to give a craft gift.
Check the kit contents before purchasing. Some listings provide only a digital pattern, while others include the full set of materials. Review the skill level, finished size, stitch types, and whether the design requires a separate frame. Choose a kit with clear diagrams and a small number of stitches for your first project. Experienced stitchers may prefer intricate samplers, multi-pattern sets, or detailed gothic scenes.
8. How to Choose the Right Halloween Pattern
Choose a pattern by matching its complexity to your skills, fabric, intended use, and available time. A small outline motif is suitable for a first project; a full haunted-house scene may need more colors, careful transfer, and longer sessions. Use these checks before you begin:
Skill level: Pick a design that uses stitches you already know, or includes clear instructions for new stitches.
Project type: Select a hoop design for wall décor, a compact motif for a tote, or a washable design for clothing.
Fabric: Use stable cotton or linen for hand embroidery; check fabric count for counted cross stitch.
Time and detail: Compare the pattern’s size, number of colors, and filled areas with the time you can set aside.
License: Confirm whether the pattern allows personal use, gifts, or commercial production.
A pattern should fit the final item without crowding seams or leaving important details too close to the edge. Print the design at its intended size, test the transfer on a fabric scrap, and learn how to prepare your artwork for embroidery before stitching a more detailed pattern.
9. Essential Supplies and Stitches
Most beginner Halloween stitching projects need an embroidery hoop, suitable fabric, embroidery needle, floss, scissors, and a transfer method. A water-soluble pen or transfer paper can help place the design accurately, but test any marking tool on a scrap first. Use a hoop that holds the fabric taut without stretching the weave out of shape.
Learn three stitches first: backstitch for outlines, satin stitch for small filled shapes, and French knots for eyes or dots. Add stem stitch for curved lines and long-and-short stitch for gradual shading as your confidence grows. Separate floss strands when the pattern calls for them, secure thread ends neatly, and avoid pulling stitches too tight. A short stitching tutorial can help you practice each stitch before you begin the finished piece.
10. Tips for Successful DIY Halloween Embroidery Projects
Prepare the fabric before you transfer the pattern, and keep the design centered inside the hoop. Use short thread lengths to reduce tangling, then change colors where the pattern indicates. If a curve looks uneven, adjust the stitch direction rather than forcing the fabric. Remove transfer marks according to the tool’s instructions and let the piece dry fully before framing.
For reusable holiday crafts, choose durable fabric and store finished hoops in a dry place after Halloween. Sew small motifs onto felt banners, napkins, or gift bags, and secure the back so loose thread does not catch. For machine embroidery, select a design file that matches your machine format, hoop size, fabric, and stabilizer. Proper embroidery file preparation helps ensure the design is ready for the intended stitching setup.
Frequently Asked Questions
What are the best Halloween embroidery patterns for beginners?
The best beginner patterns use simple outlines and few colors. Start with a smiling ghost, small pumpkin, black cat, candy corn, bat, or spiderweb. Choose a PDF with stitch instructions, clear transfer lines, and a compact finished size.
Where can you find free Halloween embroidery patterns?
Free patterns are available on craft blogs, embroidery designer websites, and needlework resource pages. Search for printable hand embroidery PDFs, free Halloween cross stitch charts, and beginner tutorials. Check usage terms before selling finished items or reproducing the artwork.
What Halloween embroidery patterns feature pumpkins, ghosts, and witches?
Pumpkins, friendly ghosts, witch hats, cauldrons, and broomsticks are common Halloween motifs. You can stitch each design alone or combine several into a hoop, banner, tote bag, or seasonal sampler. Choose simple shapes for easier stitching and clean outlines.
How to choose the right Halloween embroidery pattern for a project?
Match the pattern to your skill level, fabric, finished item, and available time. Review stitch requirements, dimensions, thread colors, and transfer instructions before starting. Confirm the pattern license, especially when you plan to sell finished pieces or use machine embroidery.
An embroidered beanie adds a personal touch to your winter wardrobe with custom flowers, initials, leaves, or geometric designs. You can embroider a knit beanie by hand with embroidery floss, a needle, and a suitable stabilizer, or use an embroidery machine for more detailed designs. The key is to control...
Embroidery thread colors affect design visibility, brand consistency, texture, and the appearance of finished stitches. The right shades help you reproduce logos accurately, create realistic artwork, and coordinate embroidery with fabric. An embroidery thread colors chart helps you identify shades by number, name, and color family, while conversion charts help...
Learning how to embroider on a sweatshirt requires a suitable design, the right stabilizer, and careful fabric control. Sweatshirt fleece is thicker and stretchier than woven cotton, so preparation matters. With a home embroidery machine or hand needle, you can create a custom motif, name, border, or sleeve detail. Quality...
Bulk Christmas gift orders come with tight deadlines. Speed and accuracy matter more than ever during the holiday season. Vector artwork helps businesses complete large orders faster without sacrificing quality. Clean Artwork Reduces Preparation Time Vector files arrive clean and organized. They do not require heavy cleanup or redraws. This...
Christmas gifts need to look clean, polished, and professional. Vector files play a major role in achieving that quality. Without proper vectors, even the best gift idea can lose its premium feel. Clean Designs Start with Vector Artwork Vector files use smooth paths instead of pixels. This keeps artwork sharp...
Last-minute Christmas gifts still need to look thoughtful and premium. Digitizing makes fast customization possible without sacrificing quality. When time is short, embroidery digitizing delivers reliable and professional results. Why Digitizing Is Ideal for Urgent Christmas Orders Digitized embroidery runs quickly once files are ready. There is no drying time...
Christmas gifts should feel special the moment someone sees them. Digitized embroidery adds that premium touch through clean stitching and rich detail. Unlike basic decoration, professional digitized embroidery transforms simple items into high-end holiday gifts. Premium Gifts Start with Professional Digitizing Embroidery quality depends on how well a design is...
Are you searching for professionally digitized Christmas embroidery patterns ready for immediate use? There's no need to waste time with poor-quality designs or DIY digitizing struggles! A comprehensive pattern library with professionally prepared files saves time and ensures consistent quality. This guide will show you what makes a premium pattern...
Are you attempting to embroider intricate complex Christmas tree embroidery patterns this holiday season? There's no need to struggle with poor digitizing results! Quality digitizing transforms complex tree patterns into stunning embroidered artwork that customers treasure. This guide will teach you how professional digitizing makes the difference based on technical...