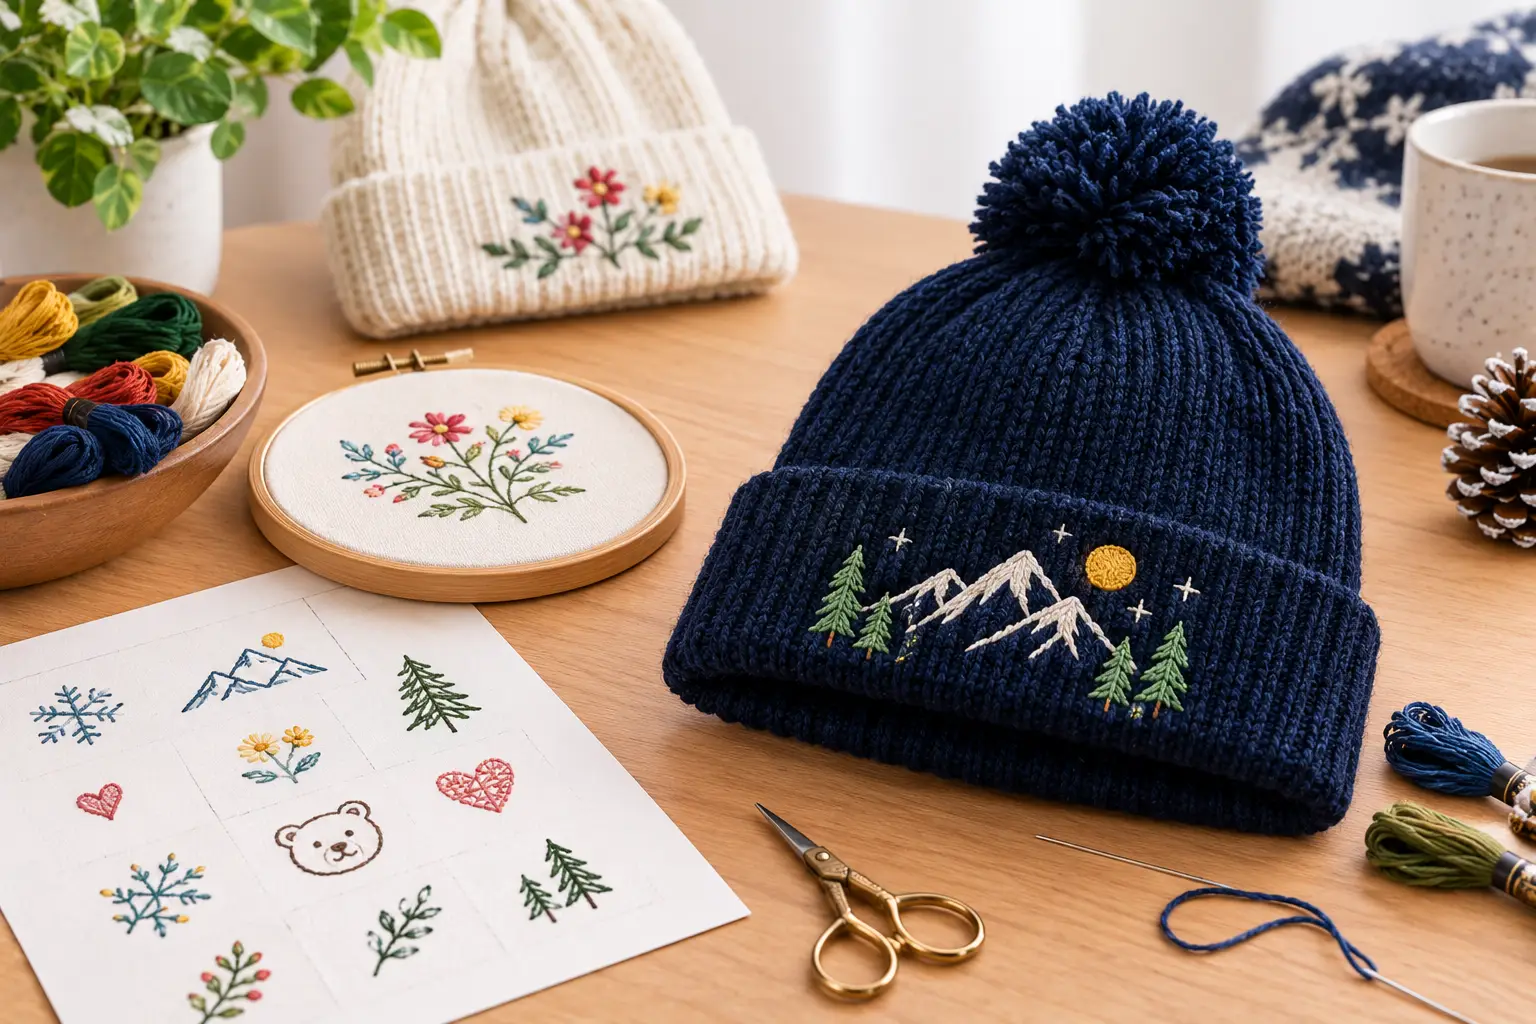
An embroidered beanie adds a personal touch to your winter wardrobe with custom flowers, initials, leaves, or geometric designs. You can embroider a knit beanie by hand with embroidery floss, a needle, and a suitable stabilizer, or use an embroidery machine for more detailed designs. The key is to control the stretch of the knit fabric, secure the design, and keep stitches flat so the finished hat remains comfortable and durable.
This guide explains how to embroider a beanie step by step, which stitches work best, how to prevent common mistakes, and how to choose embroidered winter hat designs. Quality Care Digitizing can help you prepare machine embroidery artwork when you want a professional finish for a custom beanie.
What You Need to Embroider a Beanie
Choose supplies that suit the beanie's thickness, stretch, and embroidery method. A basic hand embroidery project requires fewer tools than a machine embroidery project, but both methods need stable fabric and suitable thread.
For hand embroidery, gather these materials:
A knit or cuffed beanie made from wool, acrylic, cotton, or a blend.
A sharp embroidery needle or darning needle suited to the yarn.
Embroidery floss in your chosen colors.
Peel-and-stick or water-soluble stabilizer.
An embroidery hoop that fits the design area.
Small, sharp scissors.
A washable fabric marker, if your stabilizer requires one.
For machine embroidery, add an embroidery machine, no-show mesh cutaway stabilizer, temporary adhesive spray, and a water-soluble topper. Pins or clips can secure the beanie without shifting the design.
Select a beanie with a smooth, tightly knitted surface. Thick ribbing, loose yarn, and bulky seams make precise stitching more difficult. A cuffed beanie provides a defined area for initials or small motifs, while an uncuffed hat suits centered designs.
How to Embroider a Beanie by Hand
Use a stabilizer, light fabric tension, and short stitches to embroider a beanie without distorting the knit. Follow these six steps for a clean result.
1. Choose and Position Your Design
Select a simple beanie embroidery pattern before you prepare the fabric. Small leaves, flowers, stars, initials, and minimal line art work well because these designs need fewer stitches and place less strain on stretchy yarn.
Decide where the motif should sit. Centered designs suit the front of a beanie, while small symbols near the cuff create a subtle finish. For a folded hat, measure from the visible cuff rather than the raw edge. Mark the center with a removable marker or pin.
Keep the design appropriately sized for the available space. A small motif of approximately 1–2 inches (2.5–5 centimeters) often suits a standard beanie, although the final size depends on the hat and pattern.
2. Apply the Stabilizer
Stabilizer prevents the knit from stretching and helps stitches retain their shape. Place a peel-and-stick embroidery stabilizer over the intended design area, or trace the motif onto a suitable water-soluble sheet.
Smooth the stabilizer against the fabric without pulling the knit. Check for wrinkles, gaps, or folds beneath the pattern before stitching. You can overlap small stick-and-stitch patterns, but overlapping layers may increase needle resistance.
For hand embroidery, choose a stabilizer that washes away easily and suits the yarn. Avoid a stiff backing that leaves the finished winter hat uncomfortable against your forehead.
3. Secure the Beanie in a Hoop
Place the design area inside an embroidery hoop when the hat's thickness permits. Tighten the hoop enough to hold the fabric steady, but do not stretch the knit until the ribs widen or lose their natural shape.
A beanie may feel looser in the hoop than woven cotton because knit fabric has more give. That is acceptable when the design area stays secure. If the hat does not fit comfortably, stitch without a hoop and hold the fabric gently with your free hand.
Do not force a thick cuff between the hoop rings. Excessive pressure can leave marks, flatten the yarn, or distort the design.
4. Select Thread Colors and Stitch Length
Choose embroidery floss that contrasts with the hat without overwhelming the motif. Two or three coordinated colors usually provide enough detail for small botanical designs. Test the thread on a hidden area if you are unsure whether the color will bleed during washing.
Use short, flat stitches that follow the design. Long stitches can snag on clothing, while tight stitches can pull the knit inward. Keep the thread tension even, and avoid long thread jumps across the back of the fabric. Secure and cut the thread before starting a separate section.
5. Stitch the Design
Begin at a clear point in the pattern, such as the tip of a leaf or the end of a stem. Bring the needle through the back of the fabric to the front, then follow the chosen stitch technique. Work slowly around ribbed sections and check the front regularly for puckering.
Use the leaf stitch for filled leaves, the split back stitch for curved stems, and French knots for small berries or dots. Back stitch works well for initials, outlines, and simple lettering. Keep each stitch close to the surface so the embroidery stays comfortable and resists snagging.
6. Remove the Stabilizer and Dry the Beanie
Finish the final stitch securely, then remove the beanie from the hoop. Follow the stabilizer manufacturer's instructions to dissolve or remove the backing. Some products require warm water, while others need a gentle rinse or a specific removal method.
Do not scrub or twist wet embroidery. Press excess water out with a clean towel, reshape the hat, and lay the beanie flat to air dry. Check the motif after drying and trim any loose thread ends with sharp scissors.
How to Embroider a Beanie With a Machine
Machine embroidery works best when you stabilize the knit separately and secure the beanie without forcing thick fabric into the hoop. This method suits personalized gifts, small business orders, and repeat designs that require consistent placement.
1. Prepare the Beanie and Design
Turn the beanie inside out and identify the embroidery area. Mark the center point with a pin or removable sticker, accounting for the cuff fold. Check the embroidery file's dimensions before you begin.
Hoop a no-show mesh cutaway stabilizer tightly in the embroidery hoop. Place the beanie over the hooped stabilizer and secure the fabric with temporary adhesive spray or clips. This floating method accommodates bulky knits and reduces hoop marks.
Lightly account for the knit's natural stretch without pulling the fabric out of shape. Do not stretch the beanie to a fixed percentage unless the machine or design instructions specify that method.
3. Add a Water-Soluble Topper
Place a water-soluble topper over the knit surface. The topper prevents stitches from sinking between the yarn ribs and helps small details remain visible. Secure the topper carefully so the material stays flat during stitching.
4. Run and Finish the Embroidery
Align the machine needle with the marked center, check the hoop clearance, and stitch the design. Remove excess stabilizer according to the product instructions, trim the cutaway backing without cutting the stitches, and dissolve the topper with water.
Proper embroidery file preparation helps ensure that the design dimensions and stitch details suit the knit fabric before production.
What Stitches Are Best for a Beanie?
Leaf stitch, split back stitch, back stitch, and French knots are practical choices for hand embroidery on knit beanies. Each stitch creates a different effect and suits a specific part of the design.
Leaf Stitch
The leaf stitch fills small leaves with short stitches that extend from the central vein toward the outer edges. Bring the needle up at the leaf tip, take a short stitch toward the middle, then alternate between the left and right edges. Repeat until the leaf is filled.
Split Back Stitch
The split back stitch creates a textured line for stems and curved outlines. Make a short stitch, bring the needle up ahead of the previous stitch, and pass the needle through the center of that stitch. Repeat along the line to create a continuous outline.
French Knot
French knots create small raised dots for berries, flower centers, and decorative accents. Bring the needle to the front, wrap the floss around the needle two or three times, then insert the needle close to the original exit point. Keep the thread taut while pulling the knot into place.
Back Stitch
Back stitch creates clear outlines, initials, and simple lettering. Make a short forward stitch, bring the needle up one stitch length ahead, and return to the end of the previous stitch. Maintain consistent stitch lengths to produce a neat line.
Embroidered Beanie Ideas for Winter
Choose a compact design that suits the beanie's color, knit texture, and available space. These five embroidered beanie ideas work well for personal projects and custom gifts.
Botanical motifs: Embroider small leaves, branches, or wildflowers along the cuff for a natural design.
Personalized initials: Add one or two letters in a contrasting thread for a simple, recognizable custom beanie.
Winter symbols: Use snowflakes, stars, or small evergreen trees for seasonal accessories.
Minimal geometric designs: Add a small heart, circle, or abstract line motif for everyday wear.
Matching gift sets: Coordinate the hat's embroidery colors with scarves or gloves to create a personalized winter gift.
Choose simple outlines for ribbed beanies because heavy fills can distort the knit. Test the motif's size and thread contrast before you commit to the final design. For custom winter hats and branded beanies, Quality Care Digitizing helps prepare embroidery artwork for machine stitching and consistent results.
Common Beanie Embroidery Mistakes to Avoid
Most embroidery problems on knit hats result from excessive tension, poor stabilization, or unsuitable stitch density. Correct these issues before they damage the finished beanie.
Stretching the knit: Keep the fabric relaxed in the hoop to prevent distortion after removal.
Using long stitches: Shorten exposed stitches to reduce snagging during regular wear.
Skipping stabilizer: Add a suitable backing to support stitches and preserve design details.
Choosing dense artwork: Replace large filled shapes with lighter outlines when the knit cannot support heavy stitching.
Ignoring the inside finish: Trim loose thread ends and remove excess backing without cutting the knitted yarn.
Washing too aggressively: Follow the yarn and stabilizer care instructions, and avoid twisting or scrubbing the embroidered area.
Frequently Asked Questions
Can you embroider on beanies?
Yes, you can embroider on beanies by hand or with an embroidery machine. Use a suitable stabilizer to control the knit, select short stitches, and avoid excessive tension. Test the design on similar fabric before embroidering your finished winter hat.
What is the best way to embroider hats?
The best method depends on your equipment and the hat's fabric. Hand embroidery suits small motifs and initials, while machine embroidery offers consistent results for repeat designs. Use suitable stabilizer, secure the fabric carefully, and test the design before stitching.
How to stitch a beanie?
To stitch a beanie, secure the design area, apply a suitable stabilizer, and sew short stitches through the knit. Use back stitch for outlines, leaf stitch for foliage, and French knots for dots. Remove the stabilizer according to its instructions.
What are the best beanies for embroidery?
Smooth, tightly knitted beanies with a stable front area are best for embroidery. Acrylic, wool, cotton, and blended yarns can work when the stabilizer suits the fabric. Cuffed beanies provide a convenient area for initials, small logos, and compact motifs.
Bulk Christmas gift orders come with tight deadlines. Speed and accuracy matter more than ever during the holiday season. Vector artwork helps businesses complete large orders faster without sacrificing quality. Clean Artwork Reduces Preparation Time Vector files arrive clean and organized. They do not require heavy cleanup or redraws. This...
Christmas gifts need to look clean, polished, and professional. Vector files play a major role in achieving that quality. Without proper vectors, even the best gift idea can lose its premium feel. Clean Designs Start with Vector Artwork Vector files use smooth paths instead of pixels. This keeps artwork sharp...
Last-minute Christmas gifts still need to look thoughtful and premium. Digitizing makes fast customization possible without sacrificing quality. When time is short, embroidery digitizing delivers reliable and professional results. Why Digitizing Is Ideal for Urgent Christmas Orders Digitized embroidery runs quickly once files are ready. There is no drying time...
Christmas gifts should feel special the moment someone sees them. Digitized embroidery adds that premium touch through clean stitching and rich detail. Unlike basic decoration, professional digitized embroidery transforms simple items into high-end holiday gifts. Premium Gifts Start with Professional Digitizing Embroidery quality depends on how well a design is...
Are you searching for professionally digitized Christmas embroidery patterns ready for immediate use? There's no need to waste time with poor-quality designs or DIY digitizing struggles! A comprehensive pattern library with professionally prepared files saves time and ensures consistent quality. This guide will show you what makes a premium pattern...
Are you attempting to embroider intricate complex Christmas tree embroidery patterns this holiday season? There's no need to struggle with poor digitizing results! Quality digitizing transforms complex tree patterns into stunning embroidered artwork that customers treasure. This guide will teach you how professional digitizing makes the difference based on technical...
Are you creating premium Christmas hoodie embroidery this holiday season? There's no need to settle for amateur-looking results! Professional design guidelines transform ordinary hoodies into high-quality products customers love and recommend. This guide will teach you essential design principles for premium hoodie embroidery based on technical standards, aesthetic excellence, and...
Are you planning to create custom embroidered Christmas stockings for your family? There's no need to settle for designs that fade or distort after one season! Quality embroidery digitizing transforms holiday stockings into heirloom pieces that families treasure for generations. This guide will teach you why quality matters in stocking...
The art of digital embroidery is fascinating, and knowing how to convert SVG files to Inkstitch can elevate your designs. No matter your experience level, this guide from QualityCare will walk you through the process. Using Inkscape and Inkstitch, you’ll optimize your designs for embroidery machines and achieve professional results....