Looping stitches add movement, texture, and life to embroidery. They turn flat designs into dynamic, eye-catching artwork. Whether you’re working on fashion pieces, decorative hoops, or custom patches, mastering looping stitches helps you elevate every design.
This guide will walk you through what looping stitches are, how to use them, and practical ways to practice and perfect your embroidery skills.
Learn More: Vector Art Service
What Are Looping Stitches?
Looping stitches are embroidery techniques where the thread forms small or large loops on the fabric surface. These loops create raised textures and soft effects that catch light beautifully. They’re often used in floral patterns, fur, feathers, and textured lettering.
Depending on the type, you can make tight loops that stand upright (like punch-needle effects) or looser, flowing loops that drape naturally.
Looping stitches can be done by hand or machine, and each method gives a unique finish.
Learn More: Embroidery Digitizing Services
Why Learn Looping Stitches?
Adding loops to your embroidery gives your work depth and personality. They help:
- Add texture for 3D designs
- Create realistic effects in nature patterns like petals or wool
- Highlight specific areas like logos or lettering
- Make embroidery more creative and playful
If you’re aiming to make your embroidery stand out—especially for custom apparel or decorative patches—looping stitches are a must-have in your skill set.
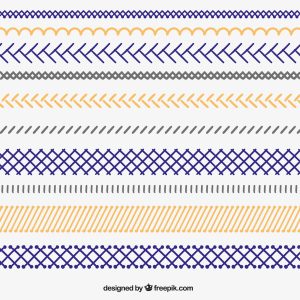
Common Types of Looping Stitches
There are several looping stitches, each serving a different purpose. Here are a few easy and versatile ones to start with:
1. Bullion Loop Stitch
This stitch forms a neat coil or loop that looks like a tiny rope. It’s great for flower petals, curls, or decorative edges.
How to do it:
Wrap your thread around the needle several times, pull it through gently, and tighten it into a coiled loop.
2. Turkey Work (Ghiordes Knot)
This creates raised, fluffy loops—perfect for textures like fur or moss.
How to do it:
Bring your needle up through the fabric, loop the thread around, and secure it with small anchoring stitches. Cut the loops if you want a soft, velvet effect.
3. Detached Chain (Lazy Daisy)
Simple and beautiful, this loop stitch is ideal for petals and leaves.
How to do it:
Bring the needle up, create a small loop, and anchor the tip with a tiny stitch to hold it in place.
4. French Knots
Technically a knot, but it creates tiny raised loops. Great for dotted textures like flower centers.
How to do it:
Wrap thread around the needle once or twice, then insert it back near the original hole and pull gently.
5. Loop Couching
Loop couching keeps your loops in place using another thread stitched over them. It’s used in lettering and decorative borders.
How to do it:
Make loops on the surface and stitch over their base using another color to lock them in place.
Materials You’ll Need
You don’t need fancy tools to get started. Gather these essentials:
- Embroidery hoop
- Embroidery needle (sharp or chenille type)
- Cotton or silk embroidery thread
- Fabric (cotton, linen, or canvas)
- Small scissors
- Fabric marker or chalk pencil
If you want loops that stand tall, use thicker thread or multiple strands. For finer work, use thinner threads.
Step-by-Step: Practicing Looping Stitches
Step 1: Choose Your Fabric and Hoop It Tight
Use a firm, woven fabric that won’t stretch too much. Place it in the hoop and tighten the screw so it stays smooth and flat.
Step 2: Sketch Your Design
Lightly draw your pattern or shape using a washable fabric pen. Keep it simple—a flower or small word is great to start with.
Step 3: Start Stitching
Thread your needle and tie a small knot at the end. Bring the needle up from the back of the fabric and begin forming loops using your chosen stitch style.
For example, for lazy daisy, bring the thread up, loop it around, and tack it down with a small anchoring stitch.
Step 4: Keep Loops Even
To make your embroidery look clean, keep loops consistent in size. Use your fingertip or a small pin to measure equal height for each loop.
Step 5: Finish Securely
Once your section is done, anchor the last stitch with a knot or small backstitch on the underside to prevent unraveling.
How to Use Looping Stitches in Real Projects
- Custom patches: Add looped details for flowers, fur, or lettering outlines.
- Apparel embroidery: Looping stitches create 3D logos or textured monograms.
- Home décor: Great for wall hoops, pillow covers, and textured artwork.
- Accessories: Try them on tote bags, denim, or hats for a hand-crafted look.
Looping stitches look especially beautiful when combined with flat stitches like satin or backstitch for contrast.
Tips for Better Results
- Always use tension control—too tight and loops flatten, too loose and they fall apart.
- Experiment with thread thickness and colors for dimensional effects.
- For beginners, practice on small fabric scraps first.
- If using machine embroidery, choose a design file with looping stitch elements and test the settings before production.
If you’re creating embroidery for brands or bulk apparel, professional digitizing services can help you prepare files that include loop stitch effects accurately for machines.
Caring for Looping Stitch Embroidery
Because loops are raised, they can catch or fray if not cared for properly. Here’s how to maintain your embroidered item:
- Wash gently by hand or on delicate settings.
- Avoid wringing or twisting.
- Let it air dry flat.
- For machine embroidery, use stabilizers to keep loops intact during washing.
Troubleshooting Common Problems
Loops keep flattening:
You may be pulling the thread too tight. Use light tension and keep loops relaxed.
Loops are uneven:
Practice consistency by marking guide dots for loop placement.
Thread tangles underneath:
Check your threading path and keep the needle length appropriate for your thread type.
Fabric puckers:
Make sure the hoop is tight and use stabilizer for thin materials.
Visit Our Service: Patch Services
Why Looping Stitches Make a Difference
Looping stitches aren’t just decorative—they transform how embroidery feels and looks. They can turn a simple logo into a textured masterpiece, add warmth to hand-stitched art, and bring new life to apparel designs.
They’re creative, customizable, and easy to learn with practice.
Conclusion: Build Texture, Build Skill
Learning looping stitches is a small step that brings a big change to your embroidery work. It teaches you precision, patience, and design control. Whether you’re hand-stitching or machine-embroidering, looping techniques help you explore the art beyond flat threadwork.
Start with basic loops, keep practicing, and soon you’ll create embroidery that pops with life and dimension.
Frequently Asked Questions (FAQs)
Q1. What are looping stitches used for?
Looping stitches add raised texture to embroidery. They’re perfect for creating floral patterns, fur effects, or dimensional lettering.
Q2. Can looping stitches be done with a machine?
Yes, advanced embroidery machines and digitizing software can mimic looping stitch effects. However, manual looping gives more creative control.
Q3. Which thread works best for looping stitches?
Cotton, silk, and wool threads work great. Choose thicker threads for raised loops and finer ones for delicate designs.
Q4. How can I make loops stand up better?
Use a stabilizer under the fabric and maintain light thread tension. The loop height depends on how far you pull the needle through.
Q5. Can I wash embroidery with loops?
Yes, but hand wash gently. Avoid heavy friction and high heat to preserve the loops.
Q6. How do I fix loops that come loose?
You can tack them down with small invisible stitches or apply a tiny drop of clear fabric glue underneath for reinforcement.